I’ve been seeing a lot of nail art involving nail tape strips, but they can be a little pricey, especially if you want more then one color and size. So here is a tutorial on making your own nail tape! The process of making it is super easy. It’s a little tricky cutting and sticking it but nothing that would be too hard at mastering. I think my next attempt will be a lot quicker. Overall, I love it and it gives me a little more options in creating nail art looks. So here are the steps:
-

- Step 1: choose your colors and paint scotch tape with two coats. I used a flat silver and sparkly silver.
-

- Step 2: Paint your nails and allow them to dry fully. It’s impossible to apply the strips with them sticky, you’ll just destroy your nails.
-

- Step 3: Make sure you give it a good 30 minutes to dry before you cut. Width is a matter of preference. I did a couple different ones. Be careful not to apply and then try to move it. One stick and done.
-
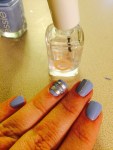
- Step 4: Apply top coat to seal your nail tape.
-

- The finished look!
